PRODUCT

Trial Bundle Preparation Made Easy - Video

A few years back we wrote a post all about trial bundles. We covered everything from what a trial bundle is; what is their purpose and why they’re important. If you didn’t get a chance to check it out, here is it: “Trial Bundles: Everything You Need To Know“. In that post we briefly touched on the steps needed to create a trial bundle. As we know that trial bundle preparation is a struggle for so many, we wanted to create a post to show you the simple way to prepare bundles using Bundledocs. Let’s jump right in…

How to Prepare a Trial Bundle using Bundledocs

(Don’t fancy reading today? Watch our short 2 minute video to see how it works!)

STEP ONE: CREATE & STRUCTURE YOUR TRIAL BUNDLE

To prepare our trial bundle we first need to create the structure. Easily create sections, sub-section and even volumes. You have complete control and can name the sections as you like. Need to make a change? Just double click! Bundledocs even offers the ability to create templates for your trial bundles which will save you even more time.

STEP TWO: ADD & NAME YOUR TRIAL DOCUMENTS 

Now that we've created the structure for our bundle, the next step is to add our trial documents. Using the upload button you can access your documents and upload them into your sections. You can upload documents from anywhere - your local pc, an online storage system (like Dropbox or Box); and we even have integrations with case/document management systems such as iManage, Tikit Partner for Windows, NetDocuments, Dropbox, Actionstep - to name just a few. Discover more about our integration partners.

STEP THREE: CUSTOMISE YOUR TRIAL BUNDLE

Now that we’ve created our sections and added our documents, we’re ready to customise our bundle to make sure it fits our firms house style, meets practice directions etc. There are many ways you can customise your trial bundle, however, if you need any help getting it just right then get in touch with our team.

Here are a few ways you can customise your trial bundle using Bundledocs:

Cover Page: Upload a custom cover page or let Bundledocs generate one for you.

Index Page: The days of manually creating an index page for your trial bundle is over. With a single click your index (or table of contents) page is created for you. It’s even hyperlinked too so you can quickly and easily search your casebook. Click and you're there!

Page or Bates Numbering: Paginating your trial bundle is done instantly. There are a number of ways you can customise it to make sure you get it just right.

STEP Four: DOWNLOAD OR SHARE ELECTRONICALLY

That’s it! When you are ready to complete your trial bundle, simply click the Generate button. Your bundle will be instantly available and can be shared electronically directly from Bundledocs, or downloaded, printed and saved. Do whatever works for you.


Interested to learn more about Bundledocs trial bundle software? We offer a free online demonstration where we take you through exactly how it all works. There’s no obligation and it only lasts about 15 minutes. Otherwise, we can get you setup with a FREE 30 day trial account so give it a try and see if it suits.

How to Prepare a Court Bundle Template with Bundledocs

Do you need to prepare a court bundle template or looking to see how to create a court bundle? Then you’ve come to the right place. Bundledocs court bundle software is your go-to solution if you need to easily prepare court bundles anytime, anywhere.

In this post we will take you through the simple steps needed to prepare a court bundle template, how to use your template to create bundles in seconds and even how to create a court bundle without a template. Let’s jump right in and see how it’s done…

Court_Bundle_Templates_Explained.png

Prepare a Court Bundle Template

Templates come in really handy for those that create bundles regularly. It will save you loads of time as you can save your bundle structure, format settings and won’t have to repeat the same steps time after time.


Top Tip! If you need to create a single court bundle then there’s really no need to create templates. Just jump down to the next section where we will take you through the simple steps needed to create a court bundle.

Follow these steps to create a court bundle template using Bundledocs:

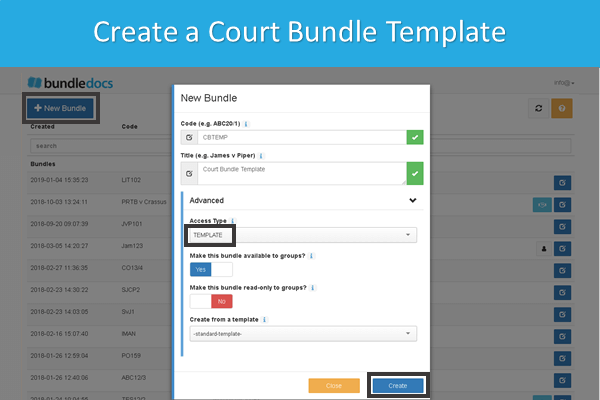
  1. Create your Template. Name your template, within the ‘Advanced‘ section choose ‘Template‘ and hit ‘Create‘.

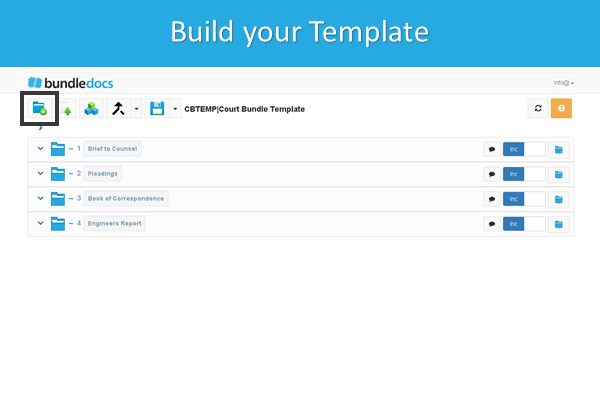
  2. Build your Template Sections. Create sections for your template (you can create as many as needed).

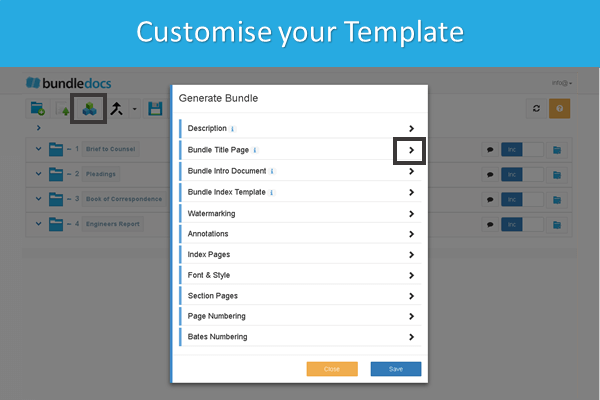
  3. Customise your Template. This step is optional but if you want to change the look and feel of your bundle this is where you do it. For example, upload a custom cover page; change where your page numbering appears; or even change how your index/table of contents page looks. So many possibilities!

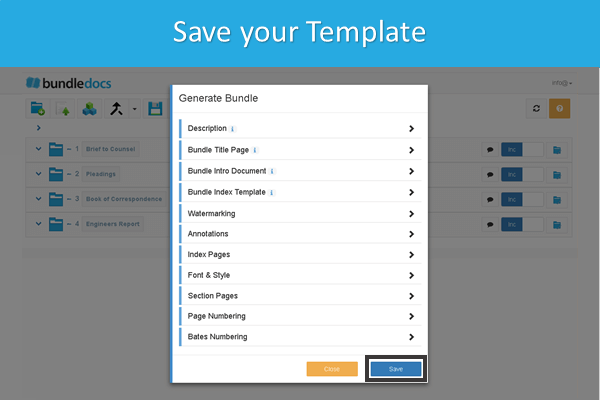
  4. Save. That’s it. When you’re finished creating your court bundle template click ‘Save‘. All your settings will be saved and ready for when you need to create your court bundle.

That’s it. Your template is created now and ready for use. All templates appear on your home screen and can be changed or amended at any time.


Create a Court Bundle from your Template

Now we’ve successfully created our template, the next step will be to create our court bundle. We simply need to choose what template we want to use and Bundledocs will instantly create our bundle for us - pulling in all the customisations and settings we set previously.

Create_a_Bundle_From_a_Template_Bundledocs_Court_Bundle_Software.png
  1. Create your Bundle. Give your bundle a code and title name.

  2. Choose your Template. Expand the ‘Advanced‘ section and select a template to use for your bundle. For example, we will choose the ‘Court Bundle Template‘ we just created.

  3. Create. Simply hit ‘Create‘ to build your bundle.

  4. Ready to Go! Now our bundle is created we are ready to add documents and build our bundle.

Create a Court Bundle with Bundledocs

(No need to use templates - anyone can create a court bundle from scratch!)

Remember, you don’t need to create a template to create the perfect court bundle. Templates are really just a handy time saver for those that create bundles frequently. If you’re looking for a quick and easy way to create a court bundle, then here’s how you do it…


  1. Create your Bundle. Give your bundle a name and hit ‘Create’.

  2. Add Sections. Select the ‘New Section‘ button to create your sections (if you’ve created your bundle using templates this will be already done for you).

  3. Upload your Documents. Upload all your documents into your bundle sections. Just drag and drop your files to move them into the right place.

  4. Generate. We’re almost there. If you want to change any settings for your bundles you can do so here. Otherwise, just click the ‘Generate‘ button.

  5. Download. It’s complete. Your court bundle is instantly available to download, send or share.

The Ultimate Court Bundling Software

At Bundledocs we’re committed to making your life easier. That’s why we created an awesome solution to your court bundling woes. It’s simple really, we do all the hard work for you. Don’t believe us? Let’s take a quick look at how Bundledocs can help you create court bundles with ease.

  • Upload Any Document Type - A court bundle can contain a range of different document types from word documents, pdf, images, emails, scans. With Bundledocs you can upload any type of document and they will be automatically merged into a single PDF file when you generate.

  • Bundledocs Creates your Index Page - Your index page will contain a list of all documents contained within your court bundle. Bundledocs will create this index page for you. That’s not all. We will also hyperlink each item so you can instantly find what you want, when you want.

  • Bundledocs does all the Page Numbering - No need to worry about making sure the numbering of your bundle is right. We handle all this for you.

  • Changes are Simple - When it comes to creating court bundles, there are always changes to be made. Whatever change you need to make simply click Save and your bundle is updated.

  • Printed Court Bundle and Electronic Bundle - All bundles are instantly available in PDF format. So you can send by email, use Bundledocs Secure Share or download and print to have a physical hard copy court bundle.

No upfront fees, no install - just get going. Only need to create a single court bundle? No problem, we’ve plans available for everyone from self litigants, legal professionals and law firms worldwide.

Don’t believe us? Give it a try for yourself. We offer a free trial so you can give it a try before you sign up. There’s absolutely no obligation and no credit card required, so there’s no reason not to give it a go!

Is there anyway to stop a bundle being generated? - Questions & Answers

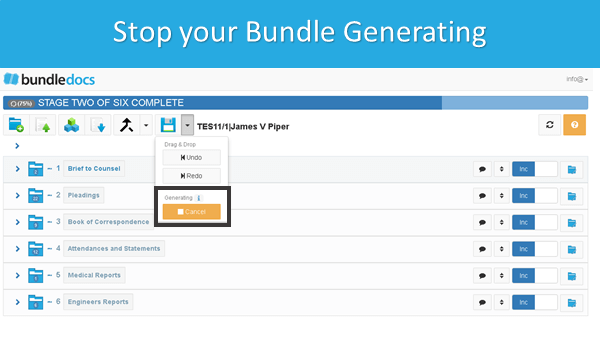
We’ve all been there. You’ve hit generate only to discover you weren’t quite ready. No need to worry, it’s simple to stop your bundle generating. Let us show you how.

Stop_Bundle_Generating_Questions_and_Answers_Bundledocs.PNG

Before we jump into how you can stop your bundle being generated, let’s cover a few of the basics…

What does it mean to generate your bundle? Bundledocs will revolutionise how you create bundles. When you generate your bundle, Bundledocs automatically merges all your documents into one single PDF file. It instantly creates an index page that lists all your sections, sub-sections and documents. It numbers everything, hyperlinks your complete index and adds bookmarks too. Amazing right?

Is it complicated? How do I generate a Bundle? It’s incredibly simple - just click one button!

Why would I need to stop a bundle generating? In most cases you won’t need to. However, if you’re creating and working on large complex bundles, this feature can come in handy. So if you ever have a time when you’ve hit generate only to discover that you weren’t quite ready yet - this will work great.

Quick View: How to Generate a Bundle with Bundledocs

How Do I Stop a Bundle Generating?

So you’ve hit generate but have discovered you need to make another couple of changes. Don’t fret, simply follow these steps to stop the process.


Step One: Select the ‘Save’ drop-down, as shown above.

Step Two: Click ‘Cancel Generating‘.


Yes, that’s really it. Now you’ve stopped the generating process, you’re free to make any changes you need. Perhaps re-order, change your index, remove that watermark - whatever it is, it’s always simple with Bundledocs!

The Simple Way to Create a Digital Binder

If you're on the hunt for a tool to help you create digital binders, then you've come to the right place. At Bundledocs, we help you do one job. Create document bundles, electronic binders and booklets from anywhere. Ready to discover how Bundledocs can help you?  

How to create a digital binder with Bundledocs? 

Bundledocs electronic closing binder software makes the whole process of creating digital binders simple. So how does it work?

  • Gather your Documents: The first thing you will need to do is upload your documents into Bundledocs. You can upload directly from your computer or we have integration links with the worlds leading solutions like iManage, NetDocuments, Tikit Partner for Windows, Dropbox, Actionstep, Clio - to name just a few.

  • Put it in Order: Once your documents are uploaded, you can adjust the order, group them, redact any text you don't want included in your completed binder - and that's it!

  • Generate: When you're ready, simple click the magical generate button. This will collate all your files into a single PDF digital binder. It will automatically create the table of contents/index page for you. It's hyperlinked and bookmarked so you can quickly jump to different parts of your binder.

  • Download or Share: As Bundledocs is cloud based you can easily send a copy to anyone that needs it or simply download and print, if you'd prefer.


Bundledocs is so simple to use, you won't even need training. But if you do, we're here to help. We can give you a quick call and take you through how it works. Or you can access our complete user manual at any time, directly within your account. 

Don't just take our word for it. In a recent article by Jason Plant (www.jasonplant.co.uk) he discussed the simplicity of Bundledocs:

I got a demo of Bundledocs the other week and thought it worth a mention, mainly because it ticks a box I’ve blogged about previously. Simplicity. The product demo took about 10 minutes, simply because the product does it’s one job easily.
— Jason Plant (www.jasonplant.co.uk)


Read the article in full: Complexity is your enemy any fool can make something complicated it is hard to make something simple.

Ready to give it a try for yourself? One of the great things about Bundledocs is it can be accessed any time, any place directly from your browser. There is no need to wait for setup and install. So whether you are looking to avail of our free 30-day trial or want to sign up straight away, access Bundledocs now to get going. 

Need more information before you get started? We would love to hear from you so get in touch with our dedicated team today for more product information or to arrange a demo for you and your team. 

How do I add annotations to my digital binder using Bundledocs - Video

Bundledocs electronic closing binder software makes adding annotations to your digital binder simple. In today's post we will take you through the latest annotation features available and will even include a short video to show you how it all works. 

Bundledocs_Annotations_May_2018.png


Annotations with a Difference

Our range of annotations include the ability to highlight important text, add comments, create document reference links and even completely redact confidential information (ensuring no trace-ability) from your pdf binder.

But that's not all. With our unique design you can do so much more with annotations. What's this you ask?

When introducing new features we give a lot of thought to the way you create and build binders. After all, our aim is to make it as simple and effortless as possible. For that reason we have designed annotations to be applied to the documents rather than on the completed bundle. 

With this there is absolutely no change to the way you apply annotations. Really, the main difference is the amazing flexibility and benefits it offers you! These include: 

  • No Annotations Lost. If you apply updates or re-generate your bundle, you don't have to worry about losing any annotations. As they are applied to the documents you can make as many changes as needed and all your annotations will still be there!

  • You Decide What Annotations are Included: With every generation of your bundle, you can choose what annotations are included and added to your bundle.

  • You Decide Who's Annotations are Included: If you are working with others, you can even choose which person's annotations are added to each bundle you generate.

  • Effortlessly Add Private Comments: When working with others on a bundle, you may want to include some personal comments that only you can see. With Bundledocs you can! Not only that, you can choose whether you want to include them or not in each bundle you generate.

  • All-in-one Solution: Bundledocs handles everything from pdf conversion, document bundling, secure sharing, collaboration and annotations. No need to purchase a range of solutions, get Bundledocs and get the results you want!


A New Way to Annotate

Before developing our range of annotation features, we spoke with a number of clients to discover the real pain points of annotations. For many this was dealing with updates and changes to their bundle (once the annotations are already applied). 

As many of you know, making changes in Bundledocs in simple. You can easily add documents, make amendments and with one click your entire bundle is instantly re-numbered, re-indexed, re-hyperlinked, re-bookmarked etc. We even have our late inserts feature for times when you want to add documents and not affect the existing table of content and page numbering. 

When developing our range of annotations, we wanted to make them as user friendly and flexible as possible. With other solutions, the annotations are added to the final completed bundle. But what if changes are made? All these annotations and all the work you've done is lost when an updated version of your binder is produced. 

That just didn't seem right. That's why we developed our annotations with a difference. 

For you there is absolutely no change to the way you apply annotations. Simply add your annotations (highlights, comments, redactions, pin-point links etc.) and save. The real difference is we add the annotations to the original documents, rather than on the completed binder. Meaning if you update or re-generate your bundle, nothing is lost. Make as many changes as you need and your annotations will still be there!


HOW DO I ADD ANNOTATIONS TO MY DIGITAL PDF BINDER? 

Check out our short video (it's only 3 minutes long) to see how simple it is to add annotations to your digital pdf binder using Bundledocs. Take a look now...


If you are interested to learn more about our new range of annotation features then login to your Bundledocs account and give it a try for yourself. Any Questions? Our team are on-hand to help so get in touch today!