PARTNER

How Do I Connect P4W to Bundledocs PDF Bundling Software

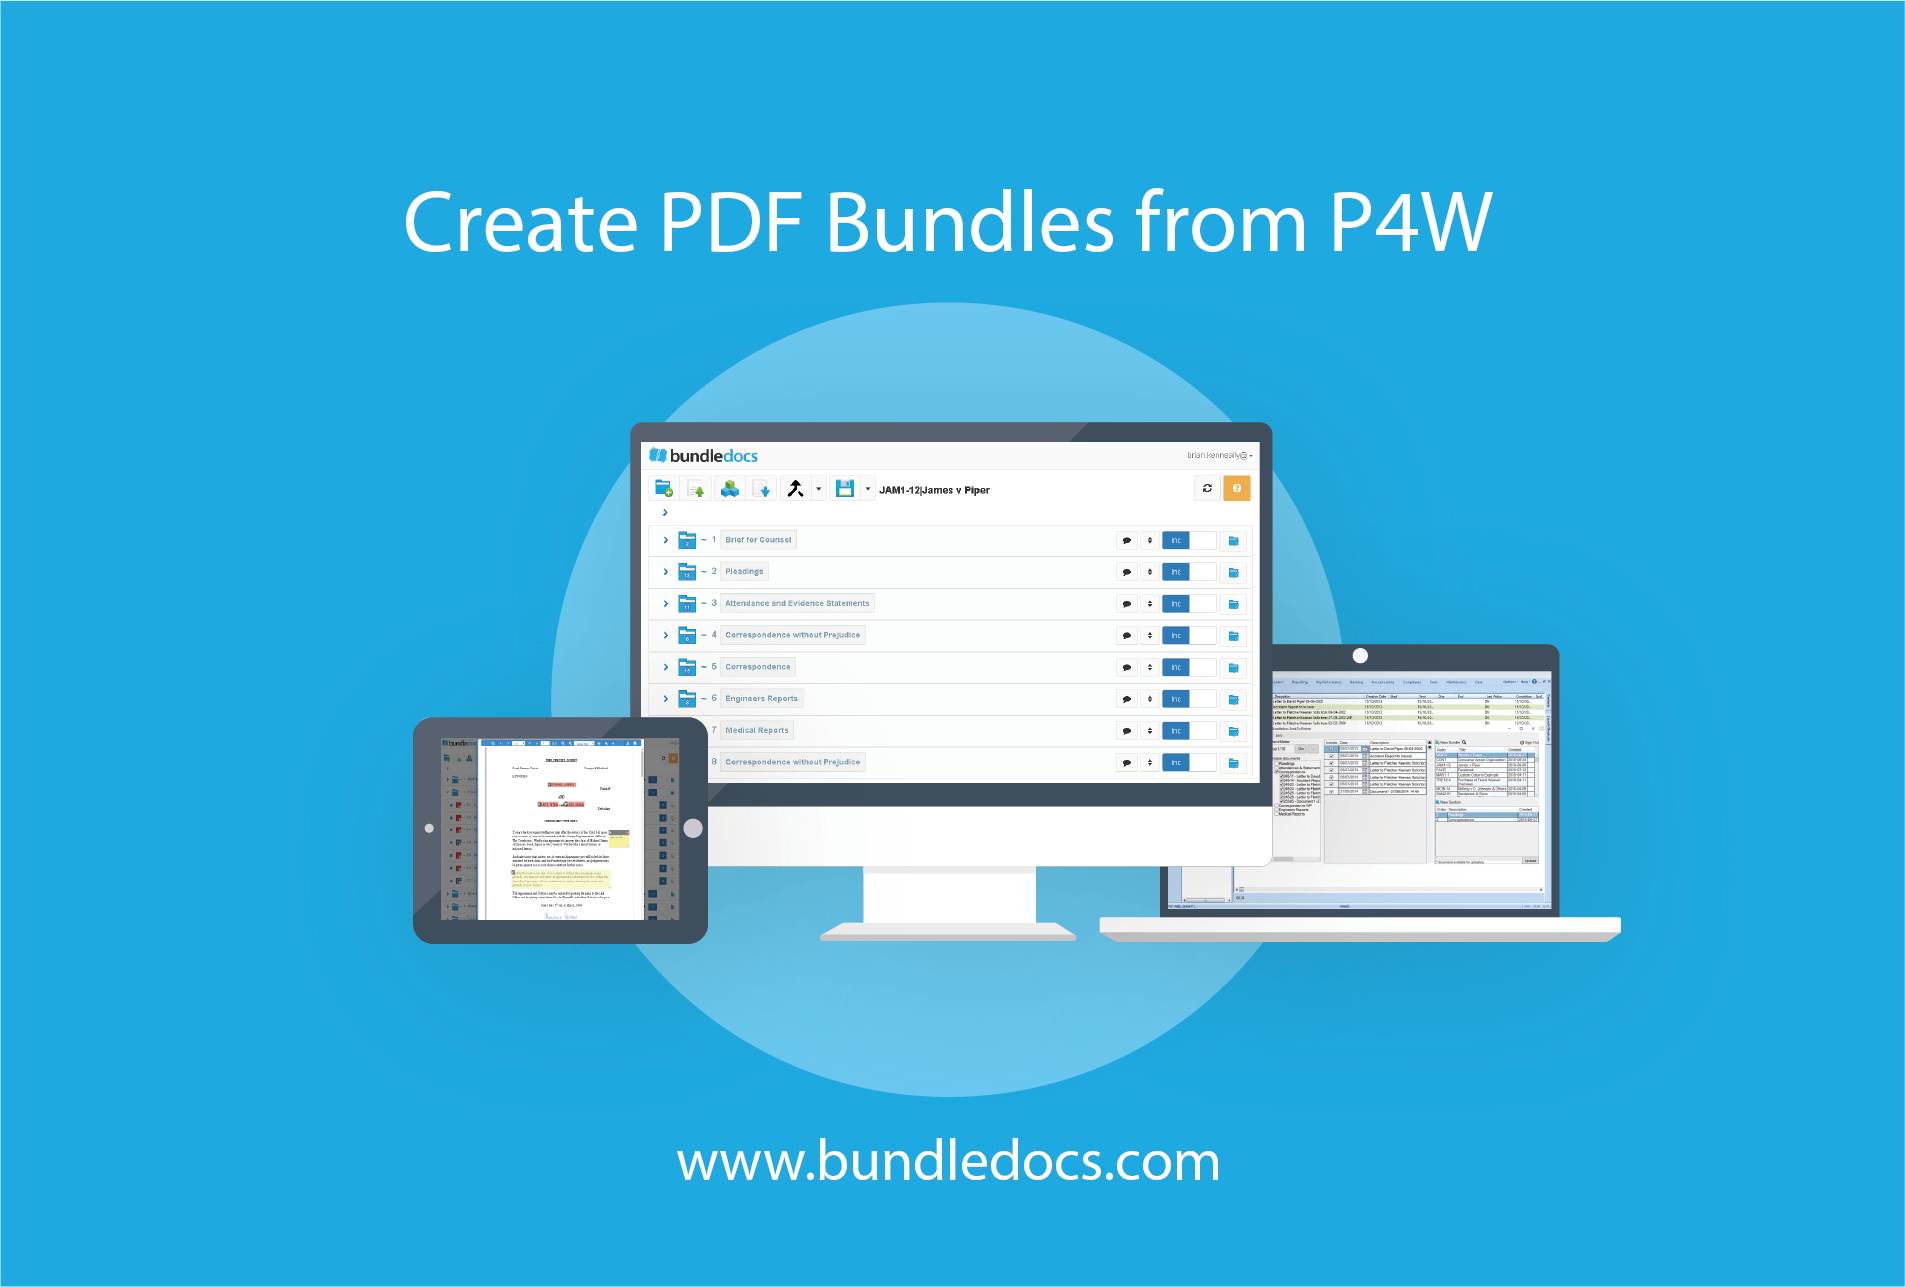
Calling all P4W users! If you’re looking for a PDF bundling tool to help you create document bundles, binders and booklets directly from Partner for Windows, then look no further than Bundledocs. Today’s post will cover how you can get the seamless integration setup.

Create_PDF_Bundles_From_Tikit_P4W_PDF_Document_Bundling_Software.png

Bundledocs, a Tikit P4W Partner, makes the process of preparing bundles quick and easy. Simply take your documents from P4W and Bundledocs will instantly organise them into a neat, indexed, paginated and sectioned bundle in minutes. The PDF bundle is instantly available to download, save, share or print.

Sound good? If you’re interested in setting up an integration between Bundledocs and Tikit P4W, then here is everything you need to know…


P4W ONE CLICK INSTALL

At Bundledocs, we want to make everything as simple and seamless as possible. That’s why we have developed a simple one click install for our integration with Partner for Windows. This means that with a single click the integration connector will be instantly setup for your entire office. No need to go from desk to desk getting it setup - one click and you’re done.

Better still, our support team want to make sure you have everything you need to get the integration setup and working. Our awesome team are available to help whenever you need them. Have a question? Need clarification? Get in touch with us today!

Once the integration is setup, remember to create your Bundledocs account. If you’re new to Bundledocs and have not had a chance to see how it works, we offer a free familiarization session to get you started. Can’t wait? Check out our ‘Bundledocs - Ultimate Document Bundling Software’ video for a quick look at how it works.


TIKIT P4W INTEGRATION WITH BUNDLEDOCS

(Discover the Ultimate PDF Bundling Tool)

Where can you access the integration with Bundledocs from Partner? The Bundledocs integration is available within the ‘Partner Task Panel’. Within this area you will be able to see the Bundledocs Icon. Simply click this icon to launch the ‘Sender for Partner’ upload window.

From here you will be able to select case documents and choose which bundle/section to upload the documents into. That not all? Our integration allows you to easily re-name files, drag and drop to re-order, remove or even change document dates etc.


Having trouble viewing our Integration with P4W video? Visit our Bundledocs YouTube Channel for our complete range of videos.


Bundledocs integration with P4W will help you instantly produce PDF bundles directly from your Partner for Windows case file. With our incredibly easy to use tool you can help reduce costs, create efficiencies and save massive amounts of time. What’s not to love?

Here’s what you need to know to get started…

  • VIDEO: Our ‘Bundledocs Partner for Windows (P4W) Integration’ (above) will give you a quick overview of how our integration connector works.

  • MANUAL: Our complete User Manual can be downloaded at any time directly from your Bundledocs account. Simply login to Bundledocs now and download a copy.

  • FREE FAMILIARIZATION SESSION: That’s not all. We even offer a free introduction to Bundledocs and P4W session to help get you up to speed on how Bundledocs works. We can arrange for a time that suits you and your team. It’s a great opportunity for us to answer any questions you have too.

Not ready to install just yet? No problem. Get in touch with our team today with any questions you have or book an online demonstration so you can see for yourself how quick and easy it is to create the perfect PDF bundle using Bundledocs and Tikit TFB Partner for Windows.

Discover How to Create PDF Bundles from Tikit P4W - Webinar

Interested to learn more about Bundledocs and how you can create PDF bundles directly from Tikit TFB? You're in luck!

This_is_the_tool_every_P4W_lawyer_needs_Bundledocs.png

Bundledocs, a Tikit P4W Partner, are delighted to partner with the guys over in Tikit for our upcoming webinar taking place on June 5th. So what will we cover?

  • The simple steps you need to create the perfect PDF bundle

  • How it links with your Partner for Windows system

  • Discover why Bundledocs should be your go-to solution for PDF bundling

  • Attendee Exclusive. All attendees will receive a FREE all access 30-day Bundledocs trial - including free integration connector and free familiarization session to get you started.

HOW CAN I REGISTER?

Come and join us! The webinar is taking place on Wednesday, June 5th at 12pm BST. That’s less than 2 weeks to go, so be sure to book your spot today.

Unable to attend the webinar? Let us know and we will arrange a free online demonstration at a date and time that suits you best.

Creating Electronic Closing Binders using NetDocuments DMS

Bundledocs electronic closing binder software makes creating closing binders simple. Our incredibly intuitive and powerful integration with NetDocuments DMS ensures that you can access your documents instantly and create your electronic closing binder regardless of where you are. Ready to see how Bundledocs makes creating electronic closing binders simple - then keep on reading…

Creating_Electronic_Closing_Binders_using_NetDocuments_DMS_and_Bundledocs.png

BUNDLEDOCS IS A NETDOCUMENTS PARTNER

Bundledocs electronic closing binder software is the one tool you need for the creation and delivery of closing binders. It handles everything from document collation, document manipulation, sharing and collaboration, OCR, redaction and annotation. It’s incredibly easy to use so you can ensure your binders are prepared in an instant!

Did we mention we’re fully integrated with NetDocuments DMS? Our partnership with NetDocuments helps deliver a true cloud integrated solution. Global law firms can securely access their NetDocs files and collaboratively build electronic closing binders, bundles, booklets and briefs from anywhere - on any device.

HOW TO CREATE AN ELECTRONIC CLOSING BINDER FROM NETDOCUMENTS

Here are the steps you need to create electronic closing binders using NetDocuments:

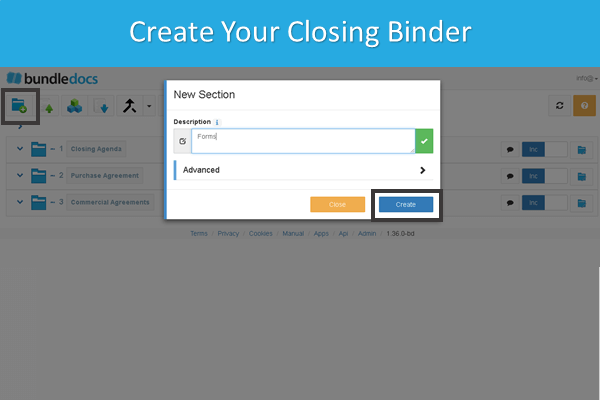
  1. CREATE YOUR CLOSING BINDER.

    Begin by creating your closing binder - give it a name and title. Once this is done you are ready to create folders, sub-folders or volumes for your binder. There is no limit to the number of folders so create as many as you need.

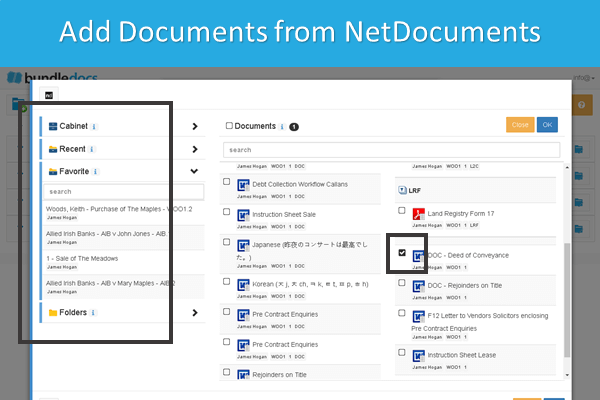
  2. ADD DOCUMENTS FROM NETDOCUMENTS DMS.

    Once you have created the structure for your binder, you are ready to begin uploading your transactions and binder documents. If you us NetDocuments as your DMS then our integration will make this process so much easier. Here is a quick video that shows how this is done: Upload Documents from NetDocuments into Bundledocs.

    Don’t worry if you don’t use NetDocuments to store your documents. You can easily access documents regardless of where they are stored. For example, upload from your local pc or c-drive, dropbox, or check out our integration partners to see what other systems Bundledocs links with.

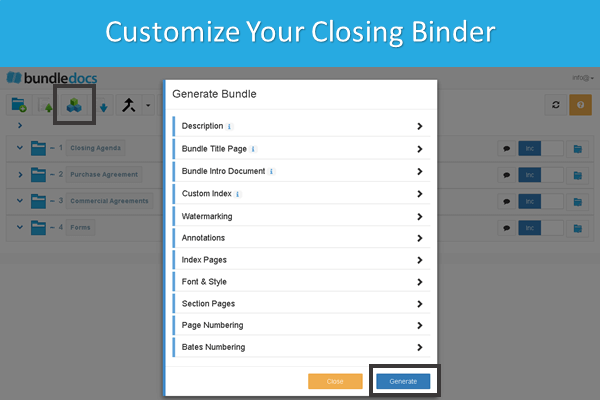
  3. CUSTOMIZE YOUR CLOSING BINDER.

    Once you have uploaded your documents from NetDocuments into Bundledocs, you’re ready to begin ordering and formatting your binder. Bundledocs offers a range of features to make sure your binder is created just how you want it. For example:

    1. Order your Documents: Now that you’ve added your NetDocs documents, you can easily amend the ordering so they appear just as you like. Watch this quick video to see how to easily move Bundledocs documents.

    2. Add a Custom Cover Page: Bundledocs automatically generates a simple cover page, however you also have the option to upload a custom cover page for your binder.

    3. Add a Custom Index Page: If you didn’t know already, once you click the ‘Generate‘ button, Bundledocs will automatically merge all your files into a single PDF document and automatically create your index page for you. There are a range of options available so you can customise how your index page appears . Alternatively, you also have the option to upload your own custom index page. Interested to learn more? Get in touch with our support team for more information.

    4. Amend Page Numbers: Bundledocs will automatically number each page of your binder. This is fully customisable and you can even completely remove page numbers if you prefer - and all with the click of a button.

    5. Choose an Export Format: By default, Bundledocs will automatically export your finished closing binder in PDF format. However, as you have complete control you can even export in a zip file if you prefer. That way you can include all the converted PDF files or the documents in their original format.

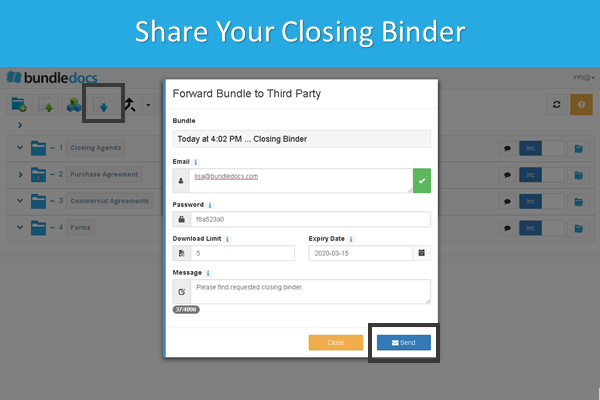
  4. SHARE YOUR BINDER ELECTRONICALLY WITH OTHERS. Now that you’ve formatted your closing binder to appear just as you like, all that’s left to do is click the generate button. This button is magic and with a single click your binder is ready. Within Bundledocs you can download to your desktop to print or even securely share with anyone that needs a copy.

TRY CREATING AN ELECTRONIC CLOSING BINDER WITH BUNDLEDOCS

Bundledocs electronic closing binder software makes the process of creating professional closing binders simple. Don’t just take our word for it. We offer a free online demonstration and a no-obligation free trial so you can try for free and see if it suits your requirements.

Remember, Bundledocs is a 100% cloud based software so you can link to NetDocuments directly from Bundledocs. Have a hosted version? Get in touch with Bundledocs Support and we can help get it setup for you.

Create a Bundle from your iManage Workspace

Did you know you can instantly create a complete bundle directly from iManage? So whether you use iManage FileSite, DeskSite or iManage Work, it’s all possible.

Create_Bundle_From_iManage_Workspace.png

It’s true. With Bundledocs you can create complete bundles directly from your iManage workspace. This will automatically pull in any folders, sub-folders and documents you have contained within your Workspace. With just a few clicks you can replicate your complete workspace into a Bundledocs bundle.


Bundledocs, an iManage integration partner, makes it simple to create a bundle, binder or booklet directly from your iManage workspace. Here’s how it works…

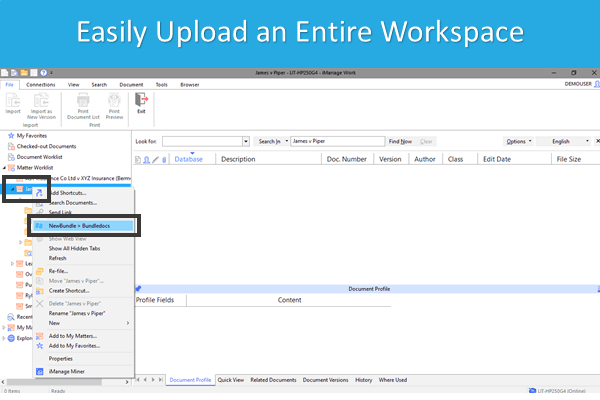
  1. Simply right click on the workspace, for example, ‘James v Piper’.

  2. From the options, select ‘NewBundle > Bundledocs’.

    Note: If you have yet to login to Bundledocs, you will be initially prompted to provide your Bundledocs username and password.

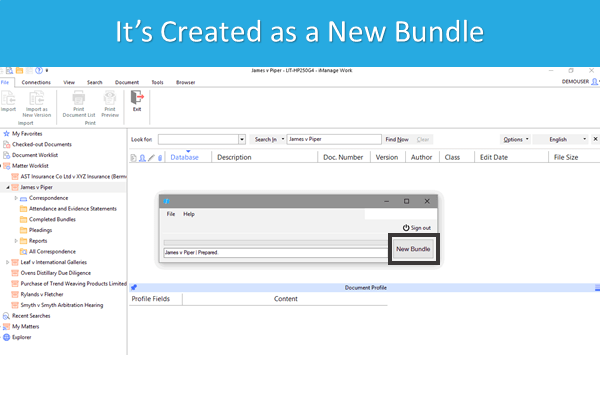
  3. From the window, select ‘New Bundle’. This will automatically begin to reproduce your workspace within Bundledocs.

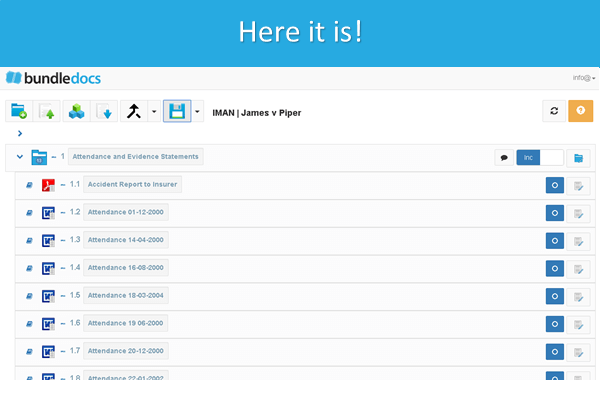
That’s it. Access your Bundledocs account via app.bundledocs.com. Within your account, a new bundle will be automatically created based on your Workspace. This will include your workspace folders, sub-folders and documents. Now that the hard work is done, you are free to customise your bundle as you like. Simple!

If you’re interested to learn more about Bundledocs and our integration with iManage, get in touch today. We can arrange a free online demonstration or trial so you can see how it works.

How Do I Create A Document Set from NetDocuments?

It’s hard to believe that so many law firms around the world still produce document bundles and document sets manually. Why so when there are awesome tools like Bundledocs available that do all the hard work for you. In today’s post we’re going to show you just how easy it is to create a document set in minutes. Interested to learn more, then keep on reading!

How_To_Create_A_Document_Set_Using_NetDocuments_DMS.png

What is a Document Set?

Before we jump into how to create a document set, let’s first address what it is. In short, a document set is simply a group of related documents. For lawyers and attorneys when compiling a casefile they will need to gather all related and relevant documents together into a document set and easily print and distribute it to others.


How Do I Create a Document Set?

Bundledocs, a NetDocuments Binder Integration Partner, makes creating document sets easy. Want to create a document set online? Here’s are the 4 steps you need to know…

  1. Create your document set. To create your document set just click the ‘New Bundle‘ button. Once created you can easily create a single/multiple folders for your set.

  2. Gather documents from NetDocuments. Bundledocs seamlessly links with NetDocuments to make it simple for you to access your documents from anywhere. Choose what documents you want included and they will be instantly added to your document set. You can even easily arrange documents by dragging and dropping - or with a single click!

  3. Generate your document set. When you are ready to compile your document, hit the ‘Generate’ button. This will collate all your document into a single set. You can even customise the look and feel to make sure it’s just right!

  4. Download or securely share with others. That’s it. Your document set (including all your NetDocuments files) is instantly available. The final set is available as a single PDF. A hyperlinked index is created, it’s fully bookmarked and each page is automatically paginated too. What could be better!

Remember, the best thing about Bundledocs is it’s fully customisable and making changes is simple. Need to remove page numbering? Want to change your index page or remove entirely? It’s all possible and can be done in an instant. Easy!

NetDocuments Cloud Partner

Did you know Bundledocs is a long-standing NetDocuments partner? As a 100% cloud tool we love connecting and partnering with other cloud providers. Our integration with NetDocuments makes it simple for you to create document sets online anywhere, any time, from any device.

If you’ve any queries about linking NetDocuments and Bundledocs, then get in touch. Or why not check out our short - Bundledocs Integration with NetDocuments video - to see it in action!


Ready to Create a Document Set with Bundledocs?

Building bundles and document sets is made easy with Bundledocs. Don’t believe us? Why not take advantage of our free 30 day trial and give it a try for yourself. Get started today!