PRODUCT

Feature Focus: Easily Merge Case Documents with Bundledocs

In our most recent release of Bundledocs, we introduced a number of great feature enhancements and updates. One of these was the re-introduction of our Merge feature. 

What is this merge function? The merge function enables you to quickly and easily merge multiple files into a single document. It is particularly beneficial if you are working with large documents. For example, some offices may scan large documents in different sections. However, when you are creating your bundle it may be preferable for these documents to be merged - so they will appear as a single file within your index and completed bundle. That's where Bundledocs comes in. 

How is this done within Bundledocs? Let's take a quick look. 

1. Upload your case documents

merge_documents_upload.png

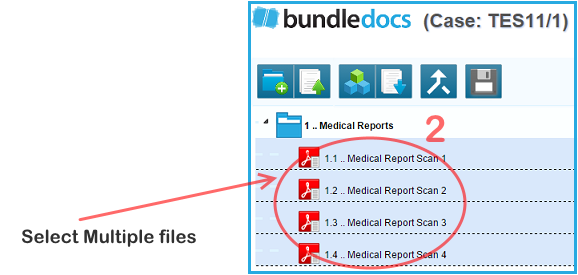
2. Select the documents you wish to merge. Remember to hold the CTRL or SHIFT key on your keyboard to select multiple documents at once. 

merge_documents_select_files.png

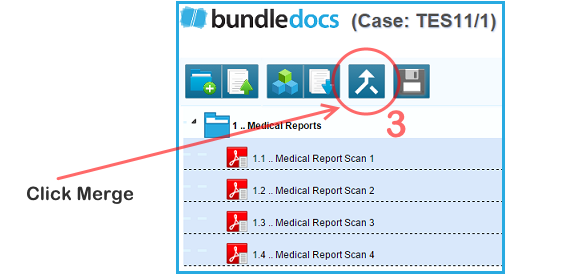
3. Once files are selected, click the 'Merge' button. You will be prompted to see if you would like to merge the selected files. Select OK to confirm. 

merge_documents_select_merge.png

4. All selected documents will be merged into a single file. By default, the newly merged documents will take the name of the first document in the sequence. To re-name, simply double click the file name. 

merge_documents_final.png

With Bundledocs, merging case documents has never been easier! Remember, if at any time you would like to split any merged documents - or any other document contained within Bundledocs - that is no problem. Simply utilise our 'Split Range' feature to quickly and easily split/divide your case documents, according to your requirements. Learn more about our 'Split Range' feature now!

Feature Focus: Upload Case Documents with Ease

As you may be aware, our December release included a number of great feature enhancements and updates. If you missed our announcement, check out our latest blog post "Exciting New Changes at Bundledocs". One of the most significant changes made was the removal of the Storage Area. No need to worry, all the same features you use are still here.

So how will these updates change the way you work? The removal of the Storage Area means it is no longer necessary to move documents from the Storage Area to the Work Area when building your bundle. You can now upload your case documents directly into the relevant section. This will help save even more time!

Let's take a quick look at how this is done...

upload_case_documents.png

1. Select the 'Upload' button

upload_case_documents_location.png

2. Within the 'Choose an upload location' section, select the dropdown. This will reveal any sections created within your bundle. Choose a section where you wish to upload your documents, for example, Pleadings. 

3. Select the 'Choose documents to upload' button and select the case documents you want to upload. Your files will immediately begin to upload and will automatically appear within the relevant section of your bundle. 

Video: Create Document Bundles in Only 5 Steps

Create High Quality Professional Bundles in just 5 Steps.

Bundledocs automates time consuming activities to ensure your create high quality professional document bundles with ease. Our software automatically creates a hyperlinked index that is bookmarked, paginated and ordered with multiple sections. Your bundle is immediately available in PDF format so it can be downloaded, printed, shared electronically or simply saved to a CD/USB.

What's the best bit? It only takes 5 steps! Take a look at our video to see it in action or try it for yourself for free. Set up your free trial account today!

Feature Focus: Preview Completed Bundle with Bundledocs

At Bundledocs, we are continually developing to help ensure we deliver the best service offering to you. Most recently, we have added a Preview Bundle Window so you can quickly and easily view your completed bundle.

Bundledocs_Preview_Completed_Bundle.png

What is the new Preview Bundle feature?

Our new preview bundle window will automatically appear once you have generated your bundle. This is great as it enables you to immediately view your completed bundle within your Bundledocs account. The preview window enables you to scroll, download or even print your bundle.

With the addition of this new feature, will I still be able to download my bundle as normal? Yes. For those that wish to download your bundle this can be done either within the preview window or by selecting the Download button (as normal). Furthermore, as Bundledocs automatically emails your completed bundle to you, it can also be downloaded within your email account. 

Feature Focus: Your Bundle is Ready to Download

For those that use Bundledocs regularly you may be aware that once you generate your bundle the completed PDF bundle is automatically emailed directly to you. This is great as it enables you to view your completed bundle from any device, at any time, regardless of whether you are in the office or now. 

For users that do not wish to receive this notification and would prefer to download it within their own account, this is no problem. Simply follow these steps: 

  • Select your email in the top right corner of your account. From the dropdown select 'My Account'.

  • Within the 'Account Information' tab, select the '+' beside the 'Options' section.

  • If you do not wish to receive these emails, then select the box next to the 'Receive Bundle Generated Email'. This will ensure that you do not receive these automatic emails.

  • Select 'Update'.

Remember, you can change back at any time. Simply re-select the 'Receive Bundle Generated Emails' to begin receiving these emails again.